
Introduction
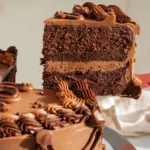
Looking for a cake that combines nostalgia, elegance, and a dash of creativity? The Vintage Heart Cake is the perfect choice to wow your guests, adding a touch of charm to any celebration. This timeless dessert is not just about its heart shaped cake design-it’s an experience. Whether you’re preparing for a heart birthday cake, a romantic gesture, or a special occasion, the vintage heart cake recipe will leave everyone in awe.
Imagine creating layers of soft, moist cake, each bite more delicious than the last. The delicate piping details, often reminiscent of a bygone era, lend a sophisticated touch to the cake. Adorn your heart shaped cake with vintage-inspired flowers or bold, intricate designs that bring the charm of the past to life. A heart shaped cake isn’t merely a dessert-it’s a celebration of love and craftsmanship.
Wondering how to make a heart shaped cake? It’s easier than you think. With the right heart for cake, you can create a cake that’s both whimsical and elegant. If you’re craving a rich treat, a chocolate heart cake or a chocolate heart shape cake will surely satisfy. Ready to elevate your baking? Learn how to decorate your heart cake with stunning details, or dive into a heart valentine day cake for the perfect romantic touch. Whatever you choose, a heart shaped cake recipe will undoubtedly impress.
Ingredients for a Vintage Heart Cake
To create a Vintage Heart Cake, you’ll need a blend of rich, flavorful ingredients for both the cake layers and the frosting. Below is a list of the ingredients you’ll need, without specific quantities:
Chocolate Cake Layers
- All-purpose flour: This forms the base of your cake, giving it structure and texture.
- Granulated sugar: Contributes sweetness and helps retain moisture in the cake.
- Dark cocoa powder: Infuses the cake with a rich, chocolate flavor.
- Baking powder: Helps the cake rise, creating a light and airy texture.
- Fine salt: Balances the sweetness and enhances the chocolate flavor.
- Unsalted butter: Provides moisture and helps create a tender crumb.
- Egg whites: Contributes to the lightness and structure of the cake.
- Buttermilk: Adds richness and moisture, along with a slight tang.
- Vegetable oil: Keeps the cake moist and adds to its tender texture.
- Vanilla extract: Enhances the flavor, adding a warm and aromatic note.
Chocolate Buttercream Frosting
- Unsalted butter: Forms the base of the frosting, making it creamy and smooth.
- Vanilla extract or vanilla bean paste: Adds depth of flavor to the frosting.
- Fine salt: Balances the sweetness of the frosting.
- Powdered sugar: Adds sweetness and helps give the frosting its consistency.
- Dark cocoa powder: Adds a rich chocolate flavor to the buttercream.
- Heavy cream or whipping cream: Contributes to the creamy texture and helps achieve the right consistency for spreading or piping.
- Dark chocolate: Melts into the frosting to give it an intense chocolatey flavor.
- Heavy cream or whipping cream (for the frosting): Helps thin the frosting to the perfect spreading consistency.
Recommended Equipment
Creating a stunning Heart Cake requires the right tools. Here’s a concise list of essential equipment:
- 8-Inch Heart-Shaped Cake Pans: These pans shape the cake into a heart, perfect for a vintage design.
- Serrated Knife: Ideal for leveling cake layers evenly.
- 10-Inch Cake Board: Provides sturdy support for the assembled cake.
- Offset Spatula: Useful for spreading and smoothing frosting.
- Bench Scraper: Helps achieve smooth sides and sharp edges.
- 3 Small Piping Bags: Allows for different frosting colors or types.
- Plastic Couplers: Enable easy switching between piping tips.
- Small Round Piping Tip (Wilton 10): Perfect for fine details.
- Very Small Round Piping Tip (Wilton 3): Ideal for intricate designs.
- Small French Piping Tip: Creates ruffled edges and decorative patterns.
- Electric Hand Mixer or Stand Mixer: Essential for mixing batter and frosting efficiently.
Is it possible to create a heart cake without using a heart-shaped pan?
Short answer, yes! You can absolutely make a Heart Shaped Cake without the need for a specialty heart-shaped pan. With a little creativity, a round cake pan, and a few simple techniques, you can craft a beautiful heart-shaped dessert that will look as lovely as any store-bought version. Here’s how to do it:
Bake the Cake:
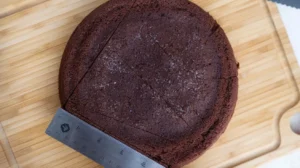
Start by baking your Vintage Heart Cake in a standard 8-inch round pan. Once baked and cooled, it’s time to shape it.
Mark the Cake:
Use a ruler to draw two lines (5 inches each) forming a 90-degree angle at the top of the cake.
Cut the Cake:
Carefully cut along the marked lines with a serrated knife to shape the top of the heart. It’s okay if the edges crack slightly.
Assemble the Heart:
Press the cut trimmings gently against the top to form the curves of the heart. Use frosting to secure the pieces in place.
Chill the Cake:
Place the cake in the freezer for 15 to 20 minutes to chill. This helps the heart cake firm up and makes it easier to frost.
Making This Vintage Heart Cake : Step-by-Step Tutorial
Creating a Vintage Heart Cake is a gratifying and delightful experience, especially when it results in a visually stunning dessert that tastes just as amazing. Whether you’re preparing it for a romantic occasion, a special celebration, or just as a treat, a Vintage Heart Cake is sure to impress. This step-by-step tutorial will guide you through the entire process, from baking the cake layers to adding intricate decorative details. Follow these simple yet effective steps, and you’ll have a beautiful chocolate heart cake to share with loved ones.
Step 1: Bake the Chocolate Cake Layers
The first step to creating your heart cake is to bake the cake layers. Preheat the oven to 350°F (175°C) and prepare two 8-inch heart shaped cake pans by lining them with parchment paper and greasing them with non-stick baking spray for easy release.
If you don’t have Vintage Heart Cake pans, don’t worry. Simply use two 8-inch round cake pans. Once the cakes are baked, you can follow the instructions from above to carve them into the shape of a heart, transforming them into a chocolate heart shape cake.
Now, prepare your chocolate heart cake recipe by mixing the ingredients together, following the provided instructions. Pour the batter evenly into the prepared pans and bake for 32-35 minutes, or until a toothpick inserted into the center of the cake comes out with a few moist crumbs. This ensures the cake is baked through but still soft and moist.
Let the cakes rest in the pans for around 10 minutes to cool. To speed up the cooling process, place the cakes in the freezer for 30 minutes. Once chilled, carefully flip the pans and remove the cake layers. At this stage, leveling the cakes is optional, but if you want perfectly even layers, use a serrated knife to trim the tops of each layer.
If you are making the cake in advance, wrap the layers and store them in the freezer. When you’re ready to assemble, take the cake out of the freezer 20 minutes before you begin frosting.
Step 2: Make the Chocolate Buttercream Frosting
While the cakes cool, it’s time to prepare the buttercream frosting. For this chocolate heart cake, a rich American buttercream is ideal as it’s sturdy and easy to pipe. If you prefer a less sweet option, you can substitute Swiss meringue buttercream or a hybrid buttercream, adding cocoa powder and melted dark chocolate to achieve the desired flavor and texture.
Mix the frosting ingredients until smooth and fluffy. If the buttercream is too thick, add a little extra cream until you achieve the right consistency—it should be thick enough to hold its shape but smooth enough to spread evenly across the cake.
Step 3: Stack and Crumb Coat the heart Cake
Once your cakes are fully cooled, begin the assembly process. Start by placing the first layer of cake onto a greaseproof cake board or a flat plate. To keep the cake from sliding around while you frost it, apply a small dab of buttercream to help anchor the first layer.
Spread an even layer of frosting between the cake layers using a large offset spatula. To ensure sharp, clean corners, place the top layer upside down. Apply a thin coat of frosting around the entire cake to seal in the crumbs. This initial layer, known as the crumb coat, helps prevent crumbs from mixing into the outer layer of frosting.
Smooth the crumb coat using a bench scraper and offset spatula, then chill the cake for 20 minutes in the fridge or 10 minutes in the freezer to allow the crumb coat to firm up.
Step 4: Apply a Second Coat of Frosting
After the crumb coat has set, it’s time for the second, thicker layer of frosting. This layer will give your heart shaped cake its smooth and finished look. Apply a generous amount of buttercream and smooth it out using a bench scraper and small offset spatula. Again, chill the cake for 20 minutes in the fridge or 10 minutes in the freezer to allow the frosting to firm up and set.
Step 5: Incorporate Extra Chocolate into the Leftover Buttercream
While the cake chills, it’s time to add an extra touch of chocolate to your frosting. Melt dark chocolate in the microwave, heating it in 15-second intervals while stirring between each interval to ensure it melts evenly. Once melted, allow it to cool for about 5 minutes before mixing it into your remaining buttercream to create 3 different shades of chocolate buttercream.
Once you’ve created the different shades, divide the frosting into separate piping bags fitted with plastic couplers. Seal the tops of the bags with rubber bands or clips and set them aside until ready for piping.
Step 6: Pipe on the Details
Now for the fun part: decorating your Vintage Heart Cake. Begin by securing a small French piping tip on the darkest bag of chocolate buttercream. Create a shell-shaped border along the top and bottom edges of the heart cake. This will create a beautiful, textured finish that’s both elegant and eye-catching.
Next, rinse the piping tip and attach it to the lightest bag of chocolate buttercream. Pipe a similar shell border above the dark chocolate border. This dual-layered effect adds dimension to your chocolate heart cake.
To add more detail, use a circle cookie cutter to mark semicircles around the side of the cake beneath the top buttercream border. Start from the bottom of the heart shape and work your way up, creating a visually appealing arrangement. Attach a very small round piping tip (such as Wilton 3) to the medium bag of chocolate buttercream and carefully pipe the semicircles around the cake. Steady your hand by anchoring your elbow to the counter to maintain consistent pressure while piping.
Step 6: Pipe on the Details
Now for the fun part: decorating your Vintage Heart Cake. Begin by securing a small French piping tip on the darkest bag of chocolate buttercream. Pipe a shell border around the top edge and base of the cake. This will create a beautiful, textured finish that’s both elegant and eye-catching.
Next, rinse the piping tip and attach it to the lightest bag of chocolate buttercream. Pipe a similar shell border above the dark chocolate border. This dual-layered effect adds dimension to your chocolate heart cake.
To add more detail, use a circle cookie cutter to mark semicircles around the side of the cake beneath the top buttercream border. Start from the bottom of the heart shape and work your way up, creating a visually appealing arrangement. Attach a very small round piping tip (such as Wilton 3) to the medium bag of chocolate buttercream and carefully pipe the semicircles around the cake. Steady your hand by anchoring your elbow to the counter to maintain consistent pressure while piping.
If any of the semicircles aren’t perfect, don’t worry—this is easily fixable! Because the frosting is chilled, it will be easy to gently scrape off and re-pipe the design. Once the first layer of semicircles is complete, pipe another layer of smaller semicircles above them.
Afterward, use a Wilton 10 small round piping tip on the lightest brown bag of frosting to pipe small hearts where the semicircles meet. You can also pipe a personalized message on top of the cake using the same tip.
Lastly, place the smallest round piping tip (Wilton 3) on the darkest frosting and pipe over the message, filling in any gaps and adding tiny hearts to the side and top of the cake. These small touches will complete the look and add extra flair to your heart shaped cake.
Substitutions and Swaps – Chocolate Buttermilk Cake Layers
Creating a chocolate heart cake is a fun and rewarding experience. If you’re missing an ingredient or need to accommodate dietary restrictions, there are plenty of easy swaps to make without sacrificing flavor or texture. Here are some simple alternatives for your vintage heart cake recipe.
All-Purpose Flour: While all-purpose flour works best, you can substitute with a gluten-free flour blend or cake flour for a lighter texture. Both will work well for a heart shaped cake.
Granulated Sugar: Stick with granulated sugar as it affects the texture of the cake. Avoid changing the type or reducing the amount for the best results in your chocolate heart shape cake.
Cocoa Powder: You can use Dutch-processed cocoa, black cocoa, or regular cocoa powder as a substitute for dark cocoa. These will give your heart shaped cake a slightly different flavor, but all work well.
Unsalted Butter: If you’re using salted butter, simply skip the salt called for in the recipe. Vegan butter can also be substituted for a dairy-free option.
Egg Whites: Instead of carton egg whites, use 5 egg whites or 3 whole eggs. For egg allergies, flaxseed eggs or egg replacers work great for a chocolate heart cake.
Buttermilk: If you don’t have buttermilk, use yogurt, sour cream, or whole milk. For dairy-free options, almond, soy, or oat milk with a bit of vinegar or lemon juice will work.
Vegetable Oil: Swap vegetable oil for canola or sunflower oil, or even coconut oil for extra richness.
Vanilla Extract: You can use almond or coconut extract, or vanilla bean paste for a more intense vanilla flavor in your heart shaped cake recipe.
Substitutions and Swaps – Chocolate Buttercream Frosting
Creating a rich chocolate buttercream frosting for your Vintage Heart Cake doesn’t require every ingredient to be exact. Here are some easy swaps for when you’re missing something or need dietary adjustments.
Unsalted Butter: If you have salted butter on hand, feel free to use it, but leave out the salt from the recipe. For a dairy-free option, vegan butter works wonderfully as a substitute, offering the same creamy texture needed for a luscious chocolate heart cake.
Heavy Cream: While heavy cream provides a rich texture, whole milk is a great substitute if you don’t have it on hand. For a dairy-free version, try soy, almond, or oat milk. These alternatives may slightly alter the flavor but will still give you a smooth frosting, perfect for a heart shaped cake recipe.
Cocoa Powder: For a deeper flavor, dark cocoa powder is recommended, but Dutch-processed cocoa, black cocoa, or regular cocoa powder will also work well in your chocolate cake in heart shape.
Dark Chocolate: Dark chocolate is ideal for adding depth, but you can also use milk chocolate or semi-sweet chocolate chips. Chopping up chocolate bars or using couverture chocolate will also work wonderfully for that silky finish on your heart shaped cake.
Making This Vintage Heart Cake in Advance and Storage Tips
Baking your Vintage Heart Cake ahead of time is a smart way to save time and simplify the process. Start by preparing the heart shaped cake layers in advance. Once baked, allow them to cool completely, then wrap them securely in plastic wrap and foil. You can store these layers in the freezer for up to a month. When you’re ready to assemble, just let them thaw at room temperature for about 1-2 hours.
The frosting can also be made ahead of time, whether it’s for a rich chocolate heart cake or a classic buttercream. Store it in piping bags or an airtight container in the fridge for up to a month, or freeze it for up to 3 months. After thawing, stir well to bring back its smooth consistency.
After assembling your heart shaped cake, it can sit out at room temperature for up to 2 days. For longer storage, place it in the fridge, where it will stay fresh for up to 5 days. This method ensures your heart shaped cake recipe stays fresh and ready to serve with minimal effort.
With these simple tips, you’ll know exactly how to make a heart cake with ease, whether you’re preparing a chocolate heart shape cake or a classic heart cake recipe.
Tips for Making the Best Vintage Heart Cake
Making a Vintage Heart Cake is simple with the right tips. Here’s how to ensure your heart shaped cake turns out perfect.
- Properly Measure the Flour: Use a kitchen scale or spoon and level the flour to avoid packing too much into the measuring cup. Accurate measurements ensure a light, fluffy chocolate heart cake.
- Use Room Temperature Ingredients: Allow butter, eggs, and buttermilk to come to room temperature for a smoother batter and better texture. Cold ingredients can cause clumps in your Vintage Heart Cake recipe.
- Chill the Cake Layers: After baking, chill the cake layers for 15 minutes to make stacking and frosting easier. Chilled layers hold their shape better and are less likely to crumble.
- Use Piping Bags or Ziplock Bags: If you don’t have piping bags, use Ziplock bags with a small cut in the corner. This is an easy way to decorate heart cake with precision.
- Manage the Heat From Your Hands: If your hands are warming the frosting, wrap the piping bag in paper towels or a kitchen towel to keep it cool and maintain a smooth texture.
- Make it Vegan or Dairy-Free: Swap buttermilk and cream with plant-based milk, and use vegan butter for a dairy-free heart shaped cake. An egg replacer can make it fully vegan.
- Ensure Buttercream Consistency: Your buttercream should be thick enough to hold its shape but smooth enough to spread for easy heart cake decoration.
Making This Vintage Heart Cake in Different Sizes
This heart cake recipe is adaptable for any occasion. Whether you need smaller layers or a larger cake, here’s how to adjust it.
3, 6-Inch Cake Layers
One batch of batter makes three, 6-inch cake layers, perfect for smaller gatherings. Bake at 350°F (175°C) for 30-35 minutes and let the layers cool before stacking and frosting.
1, 9-Inch or 10-Inch Cake Layer
For a larger cake, bake one, 9-inch or 10-inch cake layer at 350°F (175°C) for 30-35 minutes. This size works well for larger events with more servings.
9×13-Inch Sheet Cake
For larger crowds, make a 9×13-inch sheet cake. Bake at 350°F (175°C) for 30-40 minutes. This version is taller and great for slicing at big parties.
PrintVintage Heart Cake Recipe
Make a stunning Vintage Heart Cake at home with easy steps, perfect for any special occasion. This heart shaped cake will be a showstopper!
- Prep Time: 30 minutes
- Cook Time: 34 minutes
- Total Time: 2 hours 4 minutes (Additional Time 1 hour)
- Yield: 15
- Category: Dessert
- Method: Baking
- Cuisine: American
Ingredients
1 1/2 cups + 2 Tbsp all-purpose flour (210g): This is the base of your cake, providing structure and texture. Be sure to measure the flour accurately for a light, fluffy result.
2 cups granulated sugar (400g): Sugar is the secret to sweetness and moisture in the cake. It balances the cocoa powder and enhances the overall richness.
1/2 cup dark cocoa powder (50g): The cocoa powder brings that deep, chocolatey flavor that makes this cake so irresistible. Opt for high-quality dark cocoa for the best taste.
1 1/2 tsp baking powder (6g): This ingredient will ensure your cake rises perfectly, giving it a light and airy texture that contrasts beautifully with the rich frosting.
1/2 tsp fine salt (3g): A pinch of salt helps to balance the sweetness and enhances the chocolate flavor, making every bite more flavorful.
2/3 cup unsalted butter, room temperature (150g): Butter adds moisture and a tender crumb to the cake. Ensure it’s softened to room temperature to blend smoothly.
2/3 cup egg whites or about 5 egg whites (155g): Egg whites provide structure and help create a light, airy cake. Using only the whites keeps the cake delicate and soft.
1 cup buttermilk, room temperature (240g): Buttermilk adds richness and a slight tang, which complements the sweetness of the cake and makes it moist.
1 Tbsp vegetable oil (14g): Vegetable oil keeps the cake moist and adds to its tender texture. It also helps the cake layers stay fresh longer.
1 tsp vanilla extract (4g): Vanilla is the perfect complement to chocolate, enhancing the cake’s flavor and adding a warm, aromatic note.
Instructions
Chocolate Cake Layers
Preheat the Oven: Set your oven to 350°F (175°C) to ensure it’s properly heated for baking.
Prepare the Cake Pans: Line two 8-inch heart-shaped cake pans with parchment paper and grease them using non-stick baking spray or a homemade cake release mixture. If heart-shaped pans are unavailable, two 8-inch round cake pans can be used; instructions for shaping the heart are provided above.
Mix Dry Ingredients: In a large bowl or the bowl of a stand mixer, whisk together 1 1/2 cups plus 2 tablespoons of all-purpose flour, 2 cups of granulated sugar, 1/2 cup of cocoa powder, 1 1/2 teaspoons of baking powder, and 1/2 teaspoon of salt until well combined.

Incorporate Butter: Add 2/3 cup (approximately 1 and 1/3 sticks) of unsalted butter at room temperature to the dry mixture. Mix on medium-low speed using a stand mixer with a paddle attachment or a hand mixer until the mixture resembles damp sand, ensuring no large butter chunks remain.
Add Egg Whites: Pour in 2/3 cup of egg whites (about 5 large egg whites) and mix on low speed until just combined.
Combine Wet Ingredients: Add 1 cup of buttermilk, 1 tablespoon of vegetable oil, and 1 teaspoon of vanilla extract. Mix on low speed, scraping the sides and bottom of the bowl as needed with a rubber spatula. Then, beat on medium speed for about a minute to ensure a smooth batter.
Separate the batter: Pour it evenly into the prepared cake pans. Using a digital kitchen scale can help ensure equal portions, promoting uniform baking.
Bake: Place the pans in the preheated oven and bake for 32-35 minutes, or until a toothpick inserted into the center comes out with a few moist crumbs.
Let the cakes cool: Rest the cakes in the pans for 10 minutes. Run a small offset spatula around the edges to loosen the cakes. Transfer the cakes to the freezer for 30 minutes to expedite cooling. Once cooled, carefully invert the pans and remove the cakes.
Level the Cakes: If desired, use a serrated knife to level the tops of the cakes for even stacking. For advanced preparation, wrap and freeze the cakes at this stage.


Chocolate Buttercream Frosting
Beat Butter: In a stand mixer with a paddle attachment or using a hand mixer, beat 2 cups of unsalted butter at medium speed for 30 seconds until smooth.
Add Flavorings: Mix in 1 tablespoon of vanilla extract and 1/2 teaspoon of salt on low speed until combined.
Incorporate Dry Ingredients: Gradually add 6 cups of powdered sugar and 1/3 cup of cocoa powder, mixing on low speed. From time to time, scrape the sides and bottom of the bowl.
Add Cream: Pour in 1/2 cup of heavy cream and mix until smooth.
Add Melted Chocolate: Once the cake is frosted, mix in 1 1/2 cups of melted and cooled dark chocolate and 1/3 cup of heavy cream.
Adjust Consistency: If the frosting is too thick, add additional cream (1 tablespoon at a time). If too thin, incorporate more powdered sugar (a 1/4 cup at a time).

Assembling the Heart-Shaped Chocolate Cake
Prepare the Base: Place a greaseproof cake board on a flat surface. Attach the first cake layer to the board with a small amount of frosting.
Apply First Layer of Frosting: Spread a thick, even layer of buttercream on top of the first cake layer using a large offset spatula.
Add Second Cake Layer: Invert the second cake layer onto the frosted first layer, placing it upside down to facilitate easier frosting.
Crumb Coat: Apply a thin coat of frosting over the entire cake to seal in crumbs. Smooth the surface using a bench scraper. Chill the cake in the refrigerator for 20 minutes or in the freezer for 10 minutes until the frosting is firm to the touch.
Final Layer of Frosting: Apply a second, thicker layer of frosting and smooth it using a bench scraper. Refrigerate the cake once more until the frosting sets.


Adding Chocolate to the Remaining Buttercream
Melt Chocolate: Melt 1 1/2 cups of dark chocolate in the microwave, heating in 15-second intervals and stirring between each. Allow it to cool for 5 minutes to prevent melting the buttercream.
Divide Frosting: Divide the remaining buttercream into three portions.
Mix Chocolate into Frosting: Gradually mix 1/3 of the melted chocolate into the first portion of frosting, followed by 1 tablespoon of heavy cream. Repeat this process for the second and third portions, using the remaining melted chocolate and heavy cream.
Prepare Piping Bags: Transfer each chocolate-infused frosting into separate piping bags fitted with couplers. Seal the tops and set aside.

Piping Decorative Details
Pipe Shell Borders:
Secure a small French piping tip to the darkest piping bag filled with chocolate buttercream. Begin piping a shell border around the top edge and base of the cake. This will give your Vintage Heart Cake a beautiful, textured finish that highlights the elegance of the design. Once the first border is done, remove the piping tip, rinse it, and attach it to the next lighter frosting bag. Pipe another border above the dark chocolate shell border to create a layered look.Mark Semicircles:
Take a circle cookie cutter and lightly press it around the side of the cake beneath the top border of buttercream. These marks will guide your piping for the next step. Start at the bottom of the heart shape and move your way up, ensuring that the marks are evenly spaced and follow the curves of the heart.Pipe Semicircles:
Attach a very small round piping tip (like a Wilton 3) to the medium bag of chocolate buttercream. Pipe small semicircles around the side of the cake, following the marks you made earlier. Keep your hand steady by anchoring your elbow or forearm to the counter. This will help you achieve precise, even semicircles. Once the first layer of semicircles is complete, pipe a second, slightly smaller layer above the first. If any circles are imperfect, gently scrape off the frosting and try again. This process is easy to correct when the cake is chilled.Pipe Hearts and Messages:
Switch to the lightest brown buttercream and attach a small round piping tip (like Wilton 10). Pipe tiny hearts around the cake, filling in gaps or adding extra charm to the decoration. These little hearts will add a whimsical touch to your design. Then, use the same tip and frosting to pipe a sweet message on the top of the cake.Add Final Touches:
Now, attach the smallest round piping tip (Wilton 3) to the darkest chocolate buttercream. Add tiny hearts around the top and sides of the cake to further embellish the design and give it that extra finishing touch. These small details elevate the cake’s vintage aesthetic and make it even more visually appealing.


Notes
Measure Flour Accurately:
Spoon flour into the measuring cup and level it off, or weigh it with a kitchen scale for precise measurements.Use Room Temperature Ingredients:
Ingredients like butter, eggs, and buttermilk mix better when they’re at room temperature, creating a smoother batter and fluffier cake layers.Chill Cake Layers:
Place the baked cake layers in the freezer for 15 minutes before assembling. This makes them easier to stack and frost without shifting.Use Piping Bags (or Ziplock Bags):
If you don’t have piping bags, use freezer-type Ziplock bags. Just cut a 1 cm hole in the corner to pipe decorations.Prevent Melting Frosting:
If your hands are melting the frosting, wrap the piping bag in paper towels or a thin kitchen towel to maintain its consistency.Make Vegan or Dairy-Free Substitutions:
Replace buttermilk and heavy cream with dairy-free alternatives and use vegan butter and egg replacers for a delicious dairy-free version.Achieve the Right Buttercream Consistency:
Ensure your buttercream is smooth and thick enough to hold its shape. Add cream to loosen or powdered sugar to thicken as needed.Troubleshoot Cake Layer Issues:
If your cake layers are uneven or dense, refer to a cake troubleshooting guide to identify and correct the problem.
Nutrition
- Serving Size: 1
- Calories: 785
- Sugar: 87g
- Sodium: 336mg
- Fat: 43g
- Saturated Fat: 24g
- Unsaturated Fat: 16g
- Carbohydrates: 97g
- Fiber: 2g
- Protein: 6g
- Cholesterol: 105mg
Frequently Asked Questions
How do I prevent the Vintage Heart Cake from drying out?
To keep your cake moist, avoid overbaking and wrap your cake layers tightly in plastic wrap once they have cooled. You can also brush the cake with a simple syrup or flavored liquid to add moisture before frosting.
Can I decorate the Vintage Heart Cake with fondant?
Yes, fondant can be used for a smooth, polished finish on your heart shaped cake. It works well for intricate designs and can be molded into various shapes, such as flowers or lace patterns. For a vintage look, opt for pastel shades and delicate details.
What is the best frosting to use for a Vintage Heart Cake?
For a vintage heart cake recipe, buttercream frosting is often the best choice because it’s easy to pipe and can be flavored and colored to suit the occasion. If you prefer a lighter option, Swiss meringue buttercream can provide a smooth finish with less sweetness.
Can I make the Vintage Heart Cake gluten-free?
Absolutely! Simply swap out regular flour for a gluten-free flour blend. This ensures that you can enjoy the same delicious texture and flavors of the heart shaped cake recipe, suitable for those with gluten sensitivities.
How can I make the cake more elaborate?
To make your Vintage Heart Cake more elaborate, you can add detailed piping, edible flowers, or even lace patterns. Try adding some metallic gold accents, pearls, or vintage-inspired toppers for a truly striking cake that’s perfect for special occasions.
Conclusion
The Vintage Heart Cake is a stunning and timeless dessert that can be adapted for a variety of occasions. Whether it’s for a heart birthday cake, an anniversary, or a romantic celebration, this cake offers both beauty and flavor in abundance. The elegance of a heart shaped cake combined with the rich taste of a chocolate heart cake makes it a favorite for many.
The versatility of this dessert allows you to experiment with different flavors, frostings, and decorations. From a classic chocolate cake in heart shape to a lighter heart pink cake, the options are endless. The vintage heart cake recipe is simple enough for even novice bakers to follow, yet its results are impressive enough to make a statement at any event.
For a unique twist, consider adding a strawberry earthquake cake recipe to your repertoire, which brings a delightful, fruity contrast to the richness of a chocolate heart shape cake. The strawberry earthquake cake adds a surprise element with a gooey, creamy center, perfect for special occasions.
Mastering how to make a heart cake is an achievable goal for anyone, especially with a little patience and attention to detail. Whether you’re using piping bags to decorate heart cake with intricate designs or simply assembling it into a beautiful, symmetrical shape, the end result will always be a showstopper.
Whether you’re making a chocolate heart shape cake or a unique heart cake recipe, this dessert will not only satisfy your sweet tooth but will also leave a lasting impression on your guests. The Vintage Heart Cake is a true testament to the fact that love and art can be baked into one delicious creation.
Leave a comment
Your email address will not be published. Required fields are marked*