Vintage Heart Cake Recipe
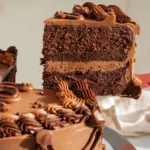
Make a stunning Vintage Heart Cake at home with easy steps, perfect for any special occasion. This heart shaped cake will be a showstopper!
- Prep Time: 30 minutes
- Cook Time: 34 minutes
- Total Time: 2 hours 4 minutes (Additional Time 1 hour)
- Yield: 15
- Category: Dessert
- Method: Baking
- Cuisine: American
Ingredients
1 1/2 cups + 2 Tbsp all-purpose flour (210g): This is the base of your cake, providing structure and texture. Be sure to measure the flour accurately for a light, fluffy result.
2 cups granulated sugar (400g): Sugar is the secret to sweetness and moisture in the cake. It balances the cocoa powder and enhances the overall richness.
1/2 cup dark cocoa powder (50g): The cocoa powder brings that deep, chocolatey flavor that makes this cake so irresistible. Opt for high-quality dark cocoa for the best taste.
1 1/2 tsp baking powder (6g): This ingredient will ensure your cake rises perfectly, giving it a light and airy texture that contrasts beautifully with the rich frosting.
1/2 tsp fine salt (3g): A pinch of salt helps to balance the sweetness and enhances the chocolate flavor, making every bite more flavorful.
2/3 cup unsalted butter, room temperature (150g): Butter adds moisture and a tender crumb to the cake. Ensure it’s softened to room temperature to blend smoothly.
2/3 cup egg whites or about 5 egg whites (155g): Egg whites provide structure and help create a light, airy cake. Using only the whites keeps the cake delicate and soft.
1 cup buttermilk, room temperature (240g): Buttermilk adds richness and a slight tang, which complements the sweetness of the cake and makes it moist.
1 Tbsp vegetable oil (14g): Vegetable oil keeps the cake moist and adds to its tender texture. It also helps the cake layers stay fresh longer.
1 tsp vanilla extract (4g): Vanilla is the perfect complement to chocolate, enhancing the cake’s flavor and adding a warm, aromatic note.
Instructions
Chocolate Cake Layers
Preheat the Oven: Set your oven to 350°F (175°C) to ensure it’s properly heated for baking.
Prepare the Cake Pans: Line two 8-inch heart-shaped cake pans with parchment paper and grease them using non-stick baking spray or a homemade cake release mixture. If heart-shaped pans are unavailable, two 8-inch round cake pans can be used; instructions for shaping the heart are provided above.
Mix Dry Ingredients: In a large bowl or the bowl of a stand mixer, whisk together 1 1/2 cups plus 2 tablespoons of all-purpose flour, 2 cups of granulated sugar, 1/2 cup of cocoa powder, 1 1/2 teaspoons of baking powder, and 1/2 teaspoon of salt until well combined.

Incorporate Butter: Add 2/3 cup (approximately 1 and 1/3 sticks) of unsalted butter at room temperature to the dry mixture. Mix on medium-low speed using a stand mixer with a paddle attachment or a hand mixer until the mixture resembles damp sand, ensuring no large butter chunks remain.
Add Egg Whites: Pour in 2/3 cup of egg whites (about 5 large egg whites) and mix on low speed until just combined.
Combine Wet Ingredients: Add 1 cup of buttermilk, 1 tablespoon of vegetable oil, and 1 teaspoon of vanilla extract. Mix on low speed, scraping the sides and bottom of the bowl as needed with a rubber spatula. Then, beat on medium speed for about a minute to ensure a smooth batter.
Separate the batter: Pour it evenly into the prepared cake pans. Using a digital kitchen scale can help ensure equal portions, promoting uniform baking.
Bake: Place the pans in the preheated oven and bake for 32-35 minutes, or until a toothpick inserted into the center comes out with a few moist crumbs.
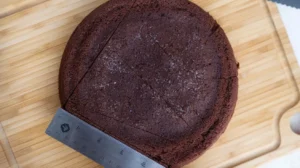
Let the cakes cool: Rest the cakes in the pans for 10 minutes. Run a small offset spatula around the edges to loosen the cakes. Transfer the cakes to the freezer for 30 minutes to expedite cooling. Once cooled, carefully invert the pans and remove the cakes.
Level the Cakes: If desired, use a serrated knife to level the tops of the cakes for even stacking. For advanced preparation, wrap and freeze the cakes at this stage.


Chocolate Buttercream Frosting
Beat Butter: In a stand mixer with a paddle attachment or using a hand mixer, beat 2 cups of unsalted butter at medium speed for 30 seconds until smooth.
Add Flavorings: Mix in 1 tablespoon of vanilla extract and 1/2 teaspoon of salt on low speed until combined.
Incorporate Dry Ingredients: Gradually add 6 cups of powdered sugar and 1/3 cup of cocoa powder, mixing on low speed. From time to time, scrape the sides and bottom of the bowl.
Add Cream: Pour in 1/2 cup of heavy cream and mix until smooth.
Add Melted Chocolate: Once the cake is frosted, mix in 1 1/2 cups of melted and cooled dark chocolate and 1/3 cup of heavy cream.
Adjust Consistency: If the frosting is too thick, add additional cream (1 tablespoon at a time). If too thin, incorporate more powdered sugar (a 1/4 cup at a time).

Assembling the Heart-Shaped Chocolate Cake
Prepare the Base: Place a greaseproof cake board on a flat surface. Attach the first cake layer to the board with a small amount of frosting.
Apply First Layer of Frosting: Spread a thick, even layer of buttercream on top of the first cake layer using a large offset spatula.
Add Second Cake Layer: Invert the second cake layer onto the frosted first layer, placing it upside down to facilitate easier frosting.
Crumb Coat: Apply a thin coat of frosting over the entire cake to seal in crumbs. Smooth the surface using a bench scraper. Chill the cake in the refrigerator for 20 minutes or in the freezer for 10 minutes until the frosting is firm to the touch.
Final Layer of Frosting: Apply a second, thicker layer of frosting and smooth it using a bench scraper. Refrigerate the cake once more until the frosting sets.


Adding Chocolate to the Remaining Buttercream
Melt Chocolate: Melt 1 1/2 cups of dark chocolate in the microwave, heating in 15-second intervals and stirring between each. Allow it to cool for 5 minutes to prevent melting the buttercream.
Divide Frosting: Divide the remaining buttercream into three portions.
Mix Chocolate into Frosting: Gradually mix 1/3 of the melted chocolate into the first portion of frosting, followed by 1 tablespoon of heavy cream. Repeat this process for the second and third portions, using the remaining melted chocolate and heavy cream.
Prepare Piping Bags: Transfer each chocolate-infused frosting into separate piping bags fitted with couplers. Seal the tops and set aside.

Piping Decorative Details
Pipe Shell Borders:
Secure a small French piping tip to the darkest piping bag filled with chocolate buttercream. Begin piping a shell border around the top edge and base of the cake. This will give your Vintage Heart Cake a beautiful, textured finish that highlights the elegance of the design. Once the first border is done, remove the piping tip, rinse it, and attach it to the next lighter frosting bag. Pipe another border above the dark chocolate shell border to create a layered look.Mark Semicircles:
Take a circle cookie cutter and lightly press it around the side of the cake beneath the top border of buttercream. These marks will guide your piping for the next step. Start at the bottom of the heart shape and move your way up, ensuring that the marks are evenly spaced and follow the curves of the heart.Pipe Semicircles:
Attach a very small round piping tip (like a Wilton 3) to the medium bag of chocolate buttercream. Pipe small semicircles around the side of the cake, following the marks you made earlier. Keep your hand steady by anchoring your elbow or forearm to the counter. This will help you achieve precise, even semicircles. Once the first layer of semicircles is complete, pipe a second, slightly smaller layer above the first. If any circles are imperfect, gently scrape off the frosting and try again. This process is easy to correct when the cake is chilled.Pipe Hearts and Messages:
Switch to the lightest brown buttercream and attach a small round piping tip (like Wilton 10). Pipe tiny hearts around the cake, filling in gaps or adding extra charm to the decoration. These little hearts will add a whimsical touch to your design. Then, use the same tip and frosting to pipe a sweet message on the top of the cake.Add Final Touches:
Now, attach the smallest round piping tip (Wilton 3) to the darkest chocolate buttercream. Add tiny hearts around the top and sides of the cake to further embellish the design and give it that extra finishing touch. These small details elevate the cake’s vintage aesthetic and make it even more visually appealing.


Notes
Measure Flour Accurately:
Spoon flour into the measuring cup and level it off, or weigh it with a kitchen scale for precise measurements.Use Room Temperature Ingredients:
Ingredients like butter, eggs, and buttermilk mix better when they’re at room temperature, creating a smoother batter and fluffier cake layers.Chill Cake Layers:
Place the baked cake layers in the freezer for 15 minutes before assembling. This makes them easier to stack and frost without shifting.Use Piping Bags (or Ziplock Bags):
If you don’t have piping bags, use freezer-type Ziplock bags. Just cut a 1 cm hole in the corner to pipe decorations.Prevent Melting Frosting:
If your hands are melting the frosting, wrap the piping bag in paper towels or a thin kitchen towel to maintain its consistency.Make Vegan or Dairy-Free Substitutions:
Replace buttermilk and heavy cream with dairy-free alternatives and use vegan butter and egg replacers for a delicious dairy-free version.Achieve the Right Buttercream Consistency:
Ensure your buttercream is smooth and thick enough to hold its shape. Add cream to loosen or powdered sugar to thicken as needed.Troubleshoot Cake Layer Issues:
If your cake layers are uneven or dense, refer to a cake troubleshooting guide to identify and correct the problem.
Nutrition
- Serving Size: 1
- Calories: 785
- Sugar: 87g
- Sodium: 336mg
- Fat: 43g
- Saturated Fat: 24g
- Unsaturated Fat: 16g
- Carbohydrates: 97g
- Fiber: 2g
- Protein: 6g
- Cholesterol: 105mg
Find it online: https://yummycookin.com/heart-cake/