
Introduction
Welcome to a delicious journey where classic cake meets a vibrant twist. In this recipe, you will discover the magic of the purple velvet cake—a unique treat that combines the nostalgic charm of a vintage cake with a modern splash of rich purple hue. This cake is not only eye-catching but also delivers a taste that is moist, light, and full of character. It is a celebration of flavor and color that stands out on any dessert table.
This recipe was born from a love for both tradition and innovation. Many of us have fond memories of a classic red velvet cake, but today, we embrace a fresh approach by adding a purple twist. By carefully balancing the ingredients and techniques, this purple velvet cake offers a delightful blend of flavors and textures. Its soft, tender crumb pairs perfectly with a thin layer of white chocolate cream cheese frosting that melts in your mouth, creating a dessert that is both visually striking and delicious.
As you follow this recipe, you will notice that every step is designed to bring out the best in both the cake layers and the frosting. The process begins with simple ingredients like all-purpose flour, cocoa powder, and buttermilk, combined in a way that transforms them into a cake that is both moist and fluffy. We also incorporate food coloring to create that distinct purple hue, setting this purple velvet cake apart from traditional versions.
Our goal is to offer you a recipe that is clear, approachable, and practical. You will find that the instructions are straightforward, with each step building on the last to help you create a masterpiece. Whether you are an experienced baker or trying out a new recipe, you will appreciate the attention to detail and the ease of following these directions.
What flavor is purple velvet cake?
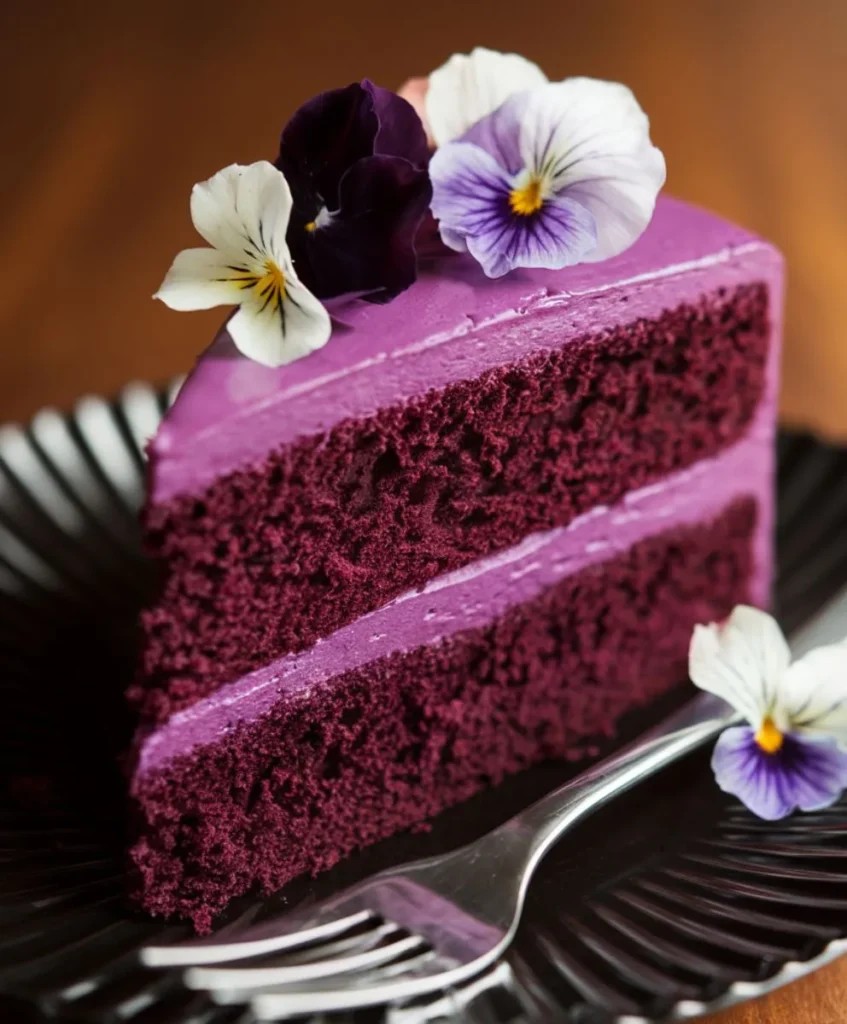
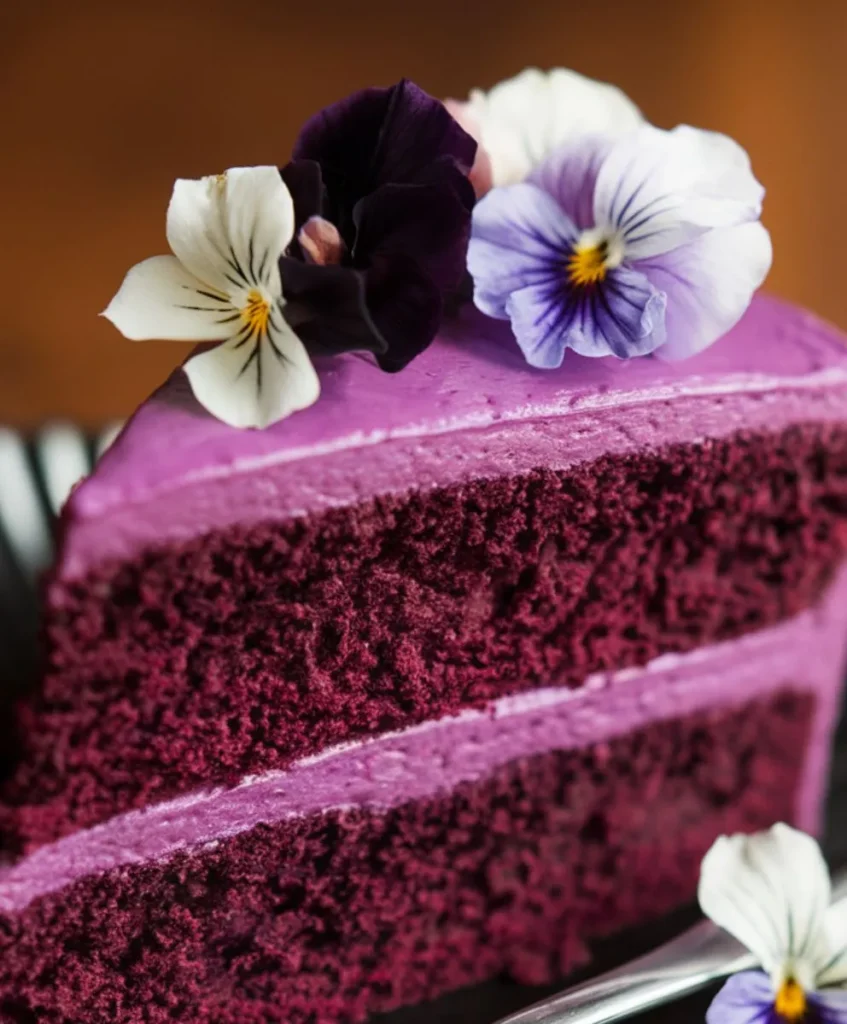
Purple velvet cake is a modern twist on traditional cake recipes that introduces a vibrant purple hue. This cake uses food coloring to create a striking appearance while maintaining a moist, tender crumb. Built on a base of all-purpose flour, cocoa powder, baking soda, and buttermilk, its texture is light and fluffy. A hint of cocoa adds a subtle flavor that enhances the overall sweetness.
The use of food coloring is key, ensuring an even, rich purple tone throughout the batter. During baking, this color deepens, making the cake a standout on any dessert table. Many enjoy purple velvet cake for its blend of familiar flavors and a fresh, innovative look—a refreshing alternative to the classic red velvet cake.
This cake is ideal for celebrations or simply treating yourself any day. Its balanced flavor and appealing color make it an exciting option for those looking to add a creative touch to their baking. Whether enjoyed with a thin layer of white chocolate cream cheese frosting or on its own, purple velvet cake offers both beauty and taste in every slice.
Why You’ll Love Purple Velvet Cake
This recipe offers a fresh twist on a classic cake. The vibrant purple hue, achieved with food coloring, transforms a familiar dessert into something truly eye-catching. The clear, step-by-step instructions make it easy to follow, ensuring your cake is moist, fluffy, and visually striking.
You will also enjoy the balanced flavor and texture. A subtle hint of cocoa deepens the taste, while a thin layer of white chocolate cream cheese frosting adds a creamy finish. Perfect for any occasion, this recipe is designed for home bakers who want to create a unique and delicious Purple Velvet Cake with ease.
PrintPurple Velvet Cake Recipe
Discover how to make a stunning purple velvet cake with cream cheese frosting, a colorful twist on the classic red velvet cake that’s sure to impress!
- Prep Time: 1 hour
- Cook Time: 1 hour
- Total Time: 5 hours (Cooling: 3 hours
- Yield: 12
- Category: Dessert
- Method: Baking
Ingredients
- Cake Layers
All-Purpose Flour: 2⅛ cups (266 grams) – note that 2⅙ cups is equivalent to 2 cups plus 2 tablespoons.
Unsweetened Cocoa: ¼ cup (24 grams) – opt for non-Dutch processed if available; reserve extra for dusting cake pans.
Leavening Agents: 1 teaspoon baking powder and 1 teaspoon baking soda.
Salt: ¼ teaspoon to enhance overall flavor.
Unsalted Butter: 8 tablespoons (4 ounces), softened, plus additional for greasing pans.
Granulated Sugar: 1½ cups (300 grams) to create a light, airy texture.
Eggs: 2, at room temperature.
Vanilla Extract: 1 teaspoon for a warm, aromatic infusion.
Buttermilk: 1 cup, measured in a 2-cup measuring cup for precision.
White Vinegar: 1 teaspoon to aid in leavening and texture.
Food Coloring: Use as desired to achieve your preferred purple hue.
- White Chocolate Cream Cheese Frosting
White Chocolate: 8 ounces (226 grams) – melt carefully to preserve its silky texture.
Cream Cheese: 12 ounces (340 grams), softened for optimal blending.
Unsalted Butter: 6 ounces (12 tablespoons or 170 grams), softened.
Vanilla Extract: 1 teaspoon to complement the frosting’s flavor.
Food Coloring: Optional, to match or accentuate the cake’s color.
- For Decoration
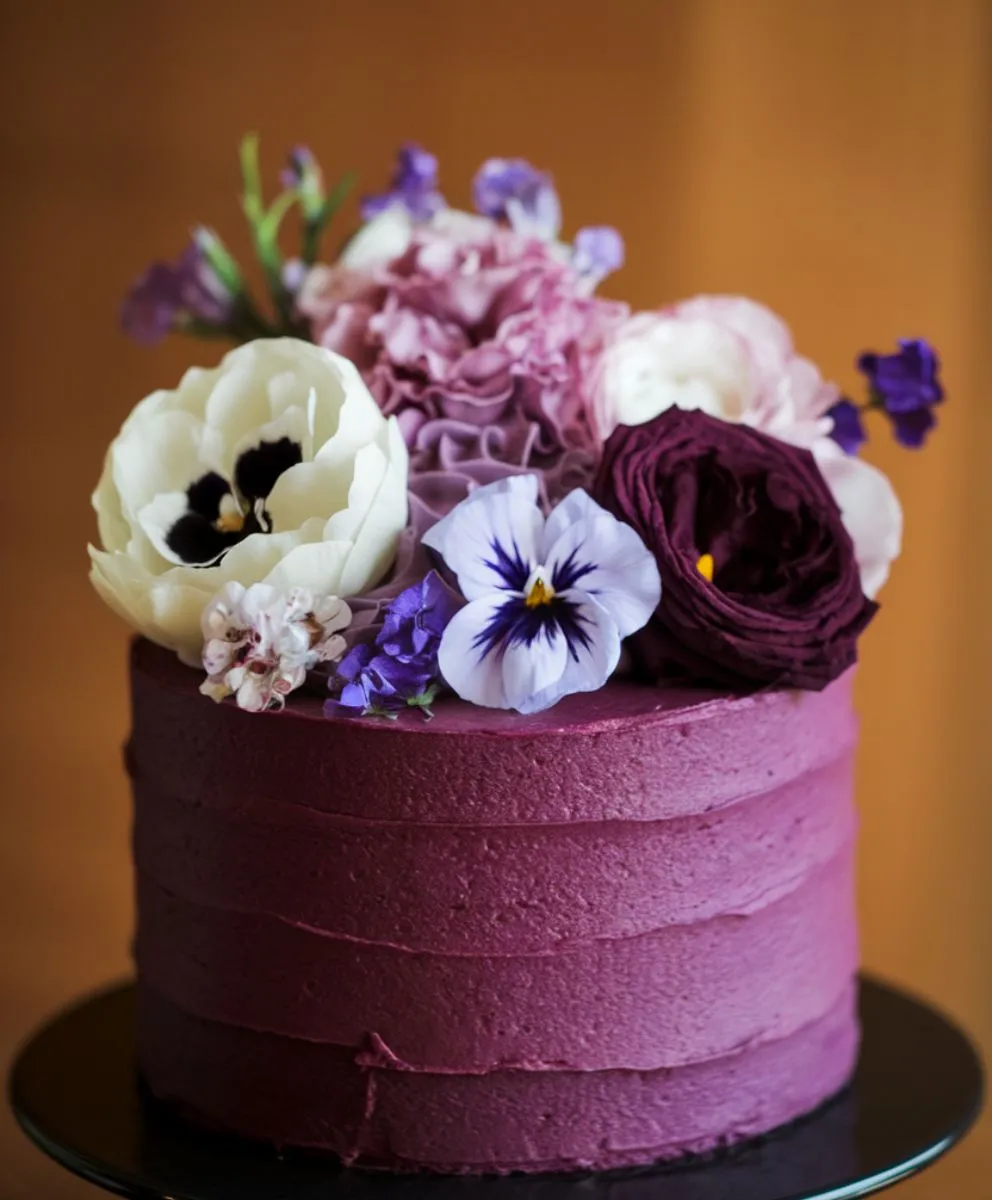
Edible flowers (pansies, lisianthus, anemones, or other safe blooms)
Small sprigs of lavender (optional)
Instructions
Step 1: Preheat and Prepare
Preheat your oven to 350°F. This crucial step guarantees a consistent baking environment. Prepare two 9-inch round cake pans by generously greasing them, lining them with parchment paper, and then lightly dusting with cocoa powder. The parchment not only prevents sticking but also ensures a pristine release of the cake.
Step 2: Sift the Dry Ingredients
In a medium bowl, sift together the all-purpose flour, unsweetened cocoa, baking powder, baking soda, and salt. This process aerates the mixture and eliminates any lumps, ensuring a light, even texture in the final product.
Step 3: Cream the Butter
Transfer the softened unsalted butter into the bowl of a stand mixer or a large mixing bowl if using a hand mixer. Beat the butter for 3 to 5 minutes until it transforms into a soft, airy base. Scrape down the bowl intermittently to ensure every portion of butter is equally whipped.
Step 4: Incorporate the Sugar
Add the granulated sugar to the creamed butter. Continue beating for an additional 1 to 2 minutes until the mixture is light, fluffy, and imbued with a delicate sweetness. This step is indispensable, as it lays the foundation for the cake’s refined texture.
Step 5: Add the Eggs
Incorporate the eggs one at a time, beating for about one minute after each addition. This gradual integration not only ensures that the eggs are well incorporated but also helps in developing a consistent, smooth batter.
Step 6: Blend in Vanilla
After the eggs have been fully incorporated, scrape down the bowl and add the vanilla extract. Beat for an additional minute, ensuring that the warm, fragrant notes are evenly distributed throughout the mixture.
Step 7: Prepare the Buttermilk Mixture
Measure the buttermilk into a 2-cup measuring cup for convenience. Stir in the white vinegar and, if desired, a few drops of food coloring. This infusion not only enhances the cake’s flavor but also sets the stage for that signature purple hue.
Step 8: Alternate Adding Dry and Wet Ingredients
Gradually incorporate the sifted dry ingredients into the creamed mixture in three additions, alternating with the buttermilk mixture in two stages. Begin and end with the dry ingredients. Mix only until just combined, taking care to scrape down the bowl as needed. Overmixing at this juncture can result in a dense, heavy cake, so a gentle hand is paramount.
Step 9: Pour and Eliminate Air Bubbles
Evenly distribute the batter into the prepared cake pans. Smooth the top with a spatula, and give the pans one or two gentle thwacks on the kitchen counter. This deliberate action removes any air bubbles that might compromise the uniformity of the cake during baking.
Step 10: Bake to Perfection
Place the pans on the middle rack of the oven and bake for approximately 25 minutes. Begin testing for doneness at 18 to 20 minutes by inserting a toothpick or knife into the center; it should emerge clean when the cake is perfectly baked. The balance between a moist crumb and a firm structure is achieved through this vigilant process.
Step 11: Cool and Set
Let the cakes rest in their pans for approximately 10 minutes to cool. Then, gently remove them and transfer to cooling racks to cool completely. This cooling period is crucial as it stabilizes the cake, preparing it for the decadent frosting. Once frosted, arrange edible flowers and mini floral sprigs on top for a beautifully natural finish, adding an elegant touch to your stunning purple velvet cake.
White Chocolate Cream Cheese Frosting Preparation
Melt and Cool the Chocolate:
In a double boiler, melt the white chocolate with cautious attention to prevent overheating. Once melted, set aside and let cool to room temperature.Cream the Base:
In a mixing bowl, combine softened cream cheese and unsalted butter. Beat them until the mixture attains a luxuriously smooth consistency.Blend in Flavor and Chocolate:
Introduce the vanilla extract and the cooled white chocolate. Blend these components thoroughly until a cohesive, silky frosting forms.Tint the Frosting (Optional):
If a specific hue is desired, add food coloring incrementally until the perfect tone is achieved.
Final Reflection
This detailed process is an ode to the art of baking. Each measured step is a journey toward creating a dessert that is as visually captivating as it is delectably sumptuous. The interplay of ingredients, from the precisely sifted flour to the meticulously blended frosting, culminates in a cake that is both a feast for the eyes and a delight for the senses. The careful orchestration of these elements transforms an ordinary recipe into an artisanal creation, inviting a celebration of both tradition and innovation. Enjoy every moment of the process and savor the symphony of flavors in each bite.
Nutrition
- Serving Size: 12
- Calories: 519kcal
- Sugar: 33g
- Sodium: 310mg
- Fat: 7g
- Saturated Fat: 20g
- Trans Fat: 1g
- Carbohydrates: 50g
- Fiber: 1g
- Protein: 7g
- Cholesterol: 113mg
Which flavor is purple cake?
Vintage cakes evoke a sense of nostalgia with every bite. Their flavor is balanced, delivering a subtle mix of sweetness, a hint of cocoa, and the tang of buttermilk. The texture is soft and tender, with a crumb that gently melts in your mouth. This combination creates a warm, comforting taste reminiscent of home-baked memories.
Every slice offers a classic flavor profile. The gentle sweetness allows the natural flavors of vanilla and cocoa to shine through without overpowering the palate. The buttermilk adds a refreshing tang that cuts through the sweetness, keeping the flavor light and inviting.
The overall experience is one of familiarity and delight. Vintage cakes remind us of simpler times when homemade treats were a centerpiece of family gatherings. The taste is both classic and satisfying, offering a smooth, well-rounded flavor that lingers pleasantly.
Ingredients for Purple Velvet Cake
Before you begin, gather all the ingredients listed below. For clarity and simplicity, we’ve provided the ingredients without specific measurements. This will help you focus on the core components needed for each part of the Purple Velvet Cake.
Cake Layers
- All-purpose flour
- Unsweetened cocoa powder (preferably not Dutch processed; extra for dusting the cake pans)
- Baking powder
- Baking soda
- Salt
- Unsalted butter (softened, plus extra for greasing)
- Granulated sugar
- Eggs (at room temperature)
- Vanilla extract
- Buttermilk (use a 2-cup measuring cup for accuracy)
- White vinegar
- Food coloring (if desired; see notes for guidance)
White Chocolate Cream Cheese Frosting
- White chocolate
- Cream cheese (softened)
- Unsalted butter (softened)
- Vanilla extract
- Food coloring (if desired; see notes for guidance)
These ingredients combine to create both the rich, moist cake layers and the smooth, flavorful frosting. Each component plays a key role in building the perfect purple velvet cake.
How to get purple cake batter?
Follow these clear, step-by-step instructions to create your purple velvet cake layers and white chocolate cream cheese frosting.
Purple Velvet Cake Layers
- Preheat and Prepare:
Preheat your oven to 350°F. Grease two 9-inch round cake pans. Line them with parchment paper, then grease the paper and dust the pans lightly with cocoa powder. - Sift Dry Ingredients:
In a medium bowl, sift together all-purpose flour, unsweetened cocoa powder, baking powder, baking soda, and salt. This ensures a light, even texture. - Beat the Butter:
Place softened unsalted butter in a stand mixer bowl (or a large mixing bowl if using a hand mixer). Beat for 3 to 5 minutes until the butter becomes soft and light, stopping to scrape down the bowl when needed. - Add Sugar:
Add granulated sugar to the butter and continue beating for another 1 to 2 minutes. The mixture should become light and fluffy. - Incorporate Eggs:
Add eggs one at a time, beating for one minute after each addition to fully incorporate them. - Mix in Vanilla:
Scrape down the bowl, add the vanilla extract, and beat for an additional minute to blend the flavors. - Prepare the Buttermilk Mixture:
Measure buttermilk into a 2-cup measuring cup. Add white vinegar and, if desired, food coloring to achieve your preferred purple hue. - Combine Ingredients:
Add the dry ingredients in three parts, alternating with the buttermilk mixture in two parts. Begin and end with the dry ingredients. Mix just until the batter is combined and scrape down the bowl as needed. - Pour and Remove Air Bubbles:
Divide the batter evenly between the prepared pans. Smooth the tops and gently tap the pans on the counter once or twice to release any air bubbles. - Bake:
Place the pans on the middle rack of the oven and bake for about 25 minutes. Start checking for doneness at 18 to 20 minutes by inserting a toothpick or knife in the center; it should come out clean when ready. - Cool:
Take the pans out of the oven and allow the cakes to rest in them for approximately 10 minutes. Then, transfer the cakes onto cooling racks and allow them to cool completely before frosting.
Please refer to the recipe card below for the detailed White Chocolate Cream Cheese Frosting Preparation.
Tips and Tricks for Purple Velvet Cake
- Measure Accurately:
Measure dry ingredients using a digital scale or standard measuring cups. Accurate measurements help achieve a consistent texture. - Room Temperature Ingredients:
Let eggs, butter, and cream cheese reach room temperature before mixing. This ensures even blending and a smoother batter. - Sift Dry Ingredients:
Sifting the flour and cocoa powder together removes lumps and incorporates air. This step is key for a light, tender cake. - Avoid Overmixing:
Stir the batter gently until all the ingredients are fully incorporated. Overmixing can lead to a dense texture. - Check Your Oven:
Oven temperatures can vary. Start checking the cake a few minutes early to avoid overbaking. - Prepare Cake Pans Well:
Grease and line your pans carefully. Dusting with cocoa powder prevents the cake from sticking and helps in easy removal. - Cool Cakes Properly:
Allow the cakes to cool in the pans for 10 minutes before transferring to a rack. Cooling fully prevents the frosting from melting when applied. - Melt Chocolate Gently:
When melting white chocolate for the frosting, use a double boiler. Stir often and avoid high heat to keep the chocolate smooth. - Customize Your Color:
Adjust the amount of food coloring to get your preferred purple shade. Add it gradually to avoid an overly intense color.
These simple tips and tricks can help you create a purple velvet cake that is moist, light, and visually appealing every time you bake. Enjoy the process and the delicious results!
What to Serve with This Purple Velvet Cake?
Purple velvet cake pairs wonderfully with a variety of accompaniments that enhance its rich flavor and striking color. Here are a few ways to elevate your dessert experience to the next level:
- Fresh Berries:
Serve the cake with a side of fresh berries like strawberries, raspberries, or blueberries. Their natural sweetness and slight tartness balance the cake’s flavors. - Vanilla Ice Cream:
A scoop of vanilla ice cream provides a refreshing and creamy balance. Its mild flavor lets the purple cake shine while adding a smooth texture. - Whipped Cream:
Top each slice with a dollop of light, airy whipped cream. This extra touch elevates the dessert without overwhelming the cake’s taste. - Coffee or Tea:
Enjoy a cup of freshly brewed coffee or a warm, herbal tea. Both are excellent choices that complement the cake’s subtle cocoa notes and creamy frosting. - Champagne or Sparkling Water:
For celebrations, serve the cake with a glass of champagne or sparkling water. These beverages add a festive touch and refresh the palate. - Light Custard:
A small serving of light custard provides a smooth, rich accompaniment. Its gentle flavor pairs well with the cake’s texture and cream cheese frosting.
Each of these serving ideas is designed to highlight the unique flavor and appearance of your purple velvet cake. Choose one or mix a few to create a complete dessert experience that is both visually appealing and delicious. Enjoy pairing your cake with these sides for an unforgettable treat!
Serving and Storing Purple Velvet Cake
Serving Your Purple Velvet Cake
- Slice Carefully:
Use a sharp knife to cut clean slices. A warmed knife can help create smooth cuts without crumbling the cake. - Presentation:
Arrange slices on a dessert plate. For a professional touch, add a thin dusting of cocoa powder or a few fresh berries on the side. - Pairing Options:
Serve with vanilla ice cream, fresh berries, or a light drizzle of custard. Each option enhances the cake’s flavor and texture, balancing the rich purple hue and smooth cream cheese frosting. - Occasion Ideas:
This purple velvet cake is perfect for birthdays, celebrations, or a special treat with friends. Its striking color and moist crumb make it a memorable centerpiece.
Storing Your Purple Velvet Cake
- Short-Term Storage:
If you plan to eat the cake within a couple of days, store it at room temperature. Lightly cover the cake with plastic wrap to maintain its moisture. - Refrigeration:
For longer storage, place the cake in an airtight container in the refrigerator. This helps keep the cake moist and fresh. Bring the cake to room temperature before serving to restore its soft texture. - Frosting Care:
Since the cake features a layer of white chocolate cream cheese frosting, keep it covered to avoid the frosting absorbing other flavors in the fridge. Ensure the container is sealed properly. - Freezing Instructions:
To freeze, wrap each cake layer tightly in plastic wrap, then in aluminum foil. Label the package with the date. Allow the cake to defrost in the refrigerator overnight before serving. Frost the cake after it has fully thawed for the best texture and flavor.
These simple serving and storing tips ensure your purple velvet cake stays as delightful as the day it was baked. Enjoy every slice knowing that your cake maintains its perfect flavor and appearance from the first bite to the last.
Common Mistakes to Avoid
- Inaccurate Measurements:
Always measure ingredients carefully. Using too much or too little flour, sugar, or cocoa can affect the cake’s texture and flavor. - Using Cold Ingredients:
Make sure the eggs, butter, and cream cheese reach room temperature before use. Cold ingredients can cause uneven mixing and a denser cake. - Overmixing the Batter:
Mix just until ingredients are combined. Overmixing can lead to a tough cake with a dense crumb. - Skipping the Sifting Step:
Sift dry ingredients to remove lumps. This simple step ensures a light and even texture in your cake layers. - Neglecting Proper Pan Preparation:
Grease and line your cake pans thoroughly. Skipping this step might cause the cake to stick, making it difficult to remove without breaking. - Over or Underbaking:
Check the cake early to avoid overbaking. An overbaked cake loses moisture, while an underbaked cake can be too dense and raw in the center. - Incorrect Food Coloring Use:
Add food coloring gradually. Too much can lead to an overly intense hue that might mask the cake’s natural flavor. - Rushing the Cooling Process:
Allow the cake to cool completely before frosting. Frosting may melt and slip off if applied to a warm cake.
Avoiding these common pitfalls will help ensure your purple velvet cake is moist, tender, and full of balanced flavor. Enjoy the process and learn from each baking experience!
Frequently Asked Questions
Can I make this cake gluten-free?
Yes, you can make a gluten-free version. Replace the all-purpose flour with a high-quality gluten-free flour blend that measures cup-for-cup like regular flour. You might have to slightly modify the liquid ingredients to attain the perfect batter consistency.
Do I have to weigh out my ingredients?
While you don’t have to weigh all ingredients, using a digital scale for key components like flour and sugar helps ensure accuracy. Precise measurements lead to a more consistent texture and overall better results.
What do I do with extra icing?
Extra icing can be stored in an airtight container in the refrigerator for up to a week. When you’re ready to use it, let it soften at room temperature and give it a good stir. You can also freeze the extra frosting for future use.
Can I make a blue velvet cake or orange velvet cake or a velvet cake in other colors?
Yes, you can experiment with different hues. Simply substitute the purple food coloring with blue, orange, or any other color you prefer. The cake’s flavor and texture will remain the same, while you create a unique dessert suited to any theme or occasion.
Can I use this recipe to make cupcakes?
Definitely. You can use this recipe to make cupcakes by pouring the batter into cupcake liners in a muffin tin. Keep an eye on the baking time, as cupcakes may need a few minutes less than a full cake.
Conclusion
Purple velvet cake is more than just a dessert—it’s an experience that blends creativity with tradition. In this guide, we’ve explored every step, from preparing the vibrant cake layers to mastering the silky white chocolate cream cheese frosting. You now have all the insights and tips to create a cake that not only looks stunning with its rich purple hue but also delights your taste buds with its moist, tender crumb and balanced flavor.
This recipe invites you to experiment with colors and flavors while keeping the process straightforward. Each section of our guide was designed to help you understand the importance of every ingredient and technique. From accurate measurements and room-temperature ingredients to careful mixing and proper pan preparation, every detail contributes to the overall success of your Purple velvet cake creation.
Keep in mind, the charm of this recipe is in its versatility and ease. You can tweak the amount of food coloring for a softer or more intense purple, experiment with additional flavors, or even adjust the frosting to suit your taste. With each bake, you’ll gain more confidence and find new ways to perfect your masterpiece.
We invite you to try this vintage cake recipe—a modern take on a time-honored classic—and discover how a touch of nostalgia can elevate your dessert experience. Enjoy the process, share the joy with family and friends, and let this purple velvet cake become a cherished part of your baking tradition. Happy baking!
Leave a comment
Your email address will not be published. Required fields are marked*