Purple Velvet Cake Recipe
Discover how to make a stunning purple velvet cake with cream cheese frosting, a colorful twist on the classic red velvet cake that’s sure to impress!
- Prep Time: 1 hour
- Cook Time: 1 hour
- Total Time: 5 hours (Cooling: 3 hours
- Yield: 12
- Category: Dessert
- Method: Baking
Ingredients
- Cake Layers
All-Purpose Flour: 2⅛ cups (266 grams) – note that 2⅙ cups is equivalent to 2 cups plus 2 tablespoons.
Unsweetened Cocoa: ¼ cup (24 grams) – opt for non-Dutch processed if available; reserve extra for dusting cake pans.
Leavening Agents: 1 teaspoon baking powder and 1 teaspoon baking soda.
Salt: ¼ teaspoon to enhance overall flavor.
Unsalted Butter: 8 tablespoons (4 ounces), softened, plus additional for greasing pans.
Granulated Sugar: 1½ cups (300 grams) to create a light, airy texture.
Eggs: 2, at room temperature.
Vanilla Extract: 1 teaspoon for a warm, aromatic infusion.
Buttermilk: 1 cup, measured in a 2-cup measuring cup for precision.
White Vinegar: 1 teaspoon to aid in leavening and texture.
Food Coloring: Use as desired to achieve your preferred purple hue.
- White Chocolate Cream Cheese Frosting
White Chocolate: 8 ounces (226 grams) – melt carefully to preserve its silky texture.
Cream Cheese: 12 ounces (340 grams), softened for optimal blending.
Unsalted Butter: 6 ounces (12 tablespoons or 170 grams), softened.
Vanilla Extract: 1 teaspoon to complement the frosting’s flavor.
Food Coloring: Optional, to match or accentuate the cake’s color.
- For Decoration
Edible flowers (pansies, lisianthus, anemones, or other safe blooms)
Small sprigs of lavender (optional)
Instructions
Step 1: Preheat and Prepare
Preheat your oven to 350°F. This crucial step guarantees a consistent baking environment. Prepare two 9-inch round cake pans by generously greasing them, lining them with parchment paper, and then lightly dusting with cocoa powder. The parchment not only prevents sticking but also ensures a pristine release of the cake.
Step 2: Sift the Dry Ingredients
In a medium bowl, sift together the all-purpose flour, unsweetened cocoa, baking powder, baking soda, and salt. This process aerates the mixture and eliminates any lumps, ensuring a light, even texture in the final product.
Step 3: Cream the Butter
Transfer the softened unsalted butter into the bowl of a stand mixer or a large mixing bowl if using a hand mixer. Beat the butter for 3 to 5 minutes until it transforms into a soft, airy base. Scrape down the bowl intermittently to ensure every portion of butter is equally whipped.
Step 4: Incorporate the Sugar
Add the granulated sugar to the creamed butter. Continue beating for an additional 1 to 2 minutes until the mixture is light, fluffy, and imbued with a delicate sweetness. This step is indispensable, as it lays the foundation for the cake’s refined texture.
Step 5: Add the Eggs
Incorporate the eggs one at a time, beating for about one minute after each addition. This gradual integration not only ensures that the eggs are well incorporated but also helps in developing a consistent, smooth batter.
Step 6: Blend in Vanilla
After the eggs have been fully incorporated, scrape down the bowl and add the vanilla extract. Beat for an additional minute, ensuring that the warm, fragrant notes are evenly distributed throughout the mixture.
Step 7: Prepare the Buttermilk Mixture
Measure the buttermilk into a 2-cup measuring cup for convenience. Stir in the white vinegar and, if desired, a few drops of food coloring. This infusion not only enhances the cake’s flavor but also sets the stage for that signature purple hue.
Step 8: Alternate Adding Dry and Wet Ingredients
Gradually incorporate the sifted dry ingredients into the creamed mixture in three additions, alternating with the buttermilk mixture in two stages. Begin and end with the dry ingredients. Mix only until just combined, taking care to scrape down the bowl as needed. Overmixing at this juncture can result in a dense, heavy cake, so a gentle hand is paramount.
Step 9: Pour and Eliminate Air Bubbles
Evenly distribute the batter into the prepared cake pans. Smooth the top with a spatula, and give the pans one or two gentle thwacks on the kitchen counter. This deliberate action removes any air bubbles that might compromise the uniformity of the cake during baking.
Step 10: Bake to Perfection
Place the pans on the middle rack of the oven and bake for approximately 25 minutes. Begin testing for doneness at 18 to 20 minutes by inserting a toothpick or knife into the center; it should emerge clean when the cake is perfectly baked. The balance between a moist crumb and a firm structure is achieved through this vigilant process.
Step 11: Cool and Set
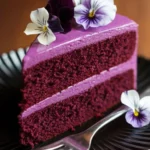
Let the cakes rest in their pans for approximately 10 minutes to cool. Then, gently remove them and transfer to cooling racks to cool completely. This cooling period is crucial as it stabilizes the cake, preparing it for the decadent frosting. Once frosted, arrange edible flowers and mini floral sprigs on top for a beautifully natural finish, adding an elegant touch to your stunning purple velvet cake.
White Chocolate Cream Cheese Frosting Preparation
Melt and Cool the Chocolate:
In a double boiler, melt the white chocolate with cautious attention to prevent overheating. Once melted, set aside and let cool to room temperature.Cream the Base:
In a mixing bowl, combine softened cream cheese and unsalted butter. Beat them until the mixture attains a luxuriously smooth consistency.Blend in Flavor and Chocolate:
Introduce the vanilla extract and the cooled white chocolate. Blend these components thoroughly until a cohesive, silky frosting forms.Tint the Frosting (Optional):
If a specific hue is desired, add food coloring incrementally until the perfect tone is achieved.
Final Reflection
This detailed process is an ode to the art of baking. Each measured step is a journey toward creating a dessert that is as visually captivating as it is delectably sumptuous. The interplay of ingredients, from the precisely sifted flour to the meticulously blended frosting, culminates in a cake that is both a feast for the eyes and a delight for the senses. The careful orchestration of these elements transforms an ordinary recipe into an artisanal creation, inviting a celebration of both tradition and innovation. Enjoy every moment of the process and savor the symphony of flavors in each bite.
Nutrition
- Serving Size: 12
- Calories: 519kcal
- Sugar: 33g
- Sodium: 310mg
- Fat: 7g
- Saturated Fat: 20g
- Trans Fat: 1g
- Carbohydrates: 50g
- Fiber: 1g
- Protein: 7g
- Cholesterol: 113mg
Find it online: https://yummycookin.com/purple-velvet-cake/